What Is a Selection Schedule? The Complete Guide for Builders and Designers
If you've ever managed a residential build or renovation, you know the moment. The client asks about their kitchen tapware for the third time. The tiler needs the floor tile spec by Friday. And somewhere in a shared Google Drive folder, there's a spreadsheet called "Selections_FINAL_v4_updated_USE THIS ONE.xlsx" that may or may not have the right information.
That spreadsheet — or whatever version of it you're currently wrestling with — is doing the job of a selection schedule. Badly, but doing it.
This guide breaks down what a selection schedule actually is, why it matters, and how builders, interior designers and project managers across Australia, North America and New Zealand are using them to keep projects on track and clients happy.
The basics: what is a selection schedule?
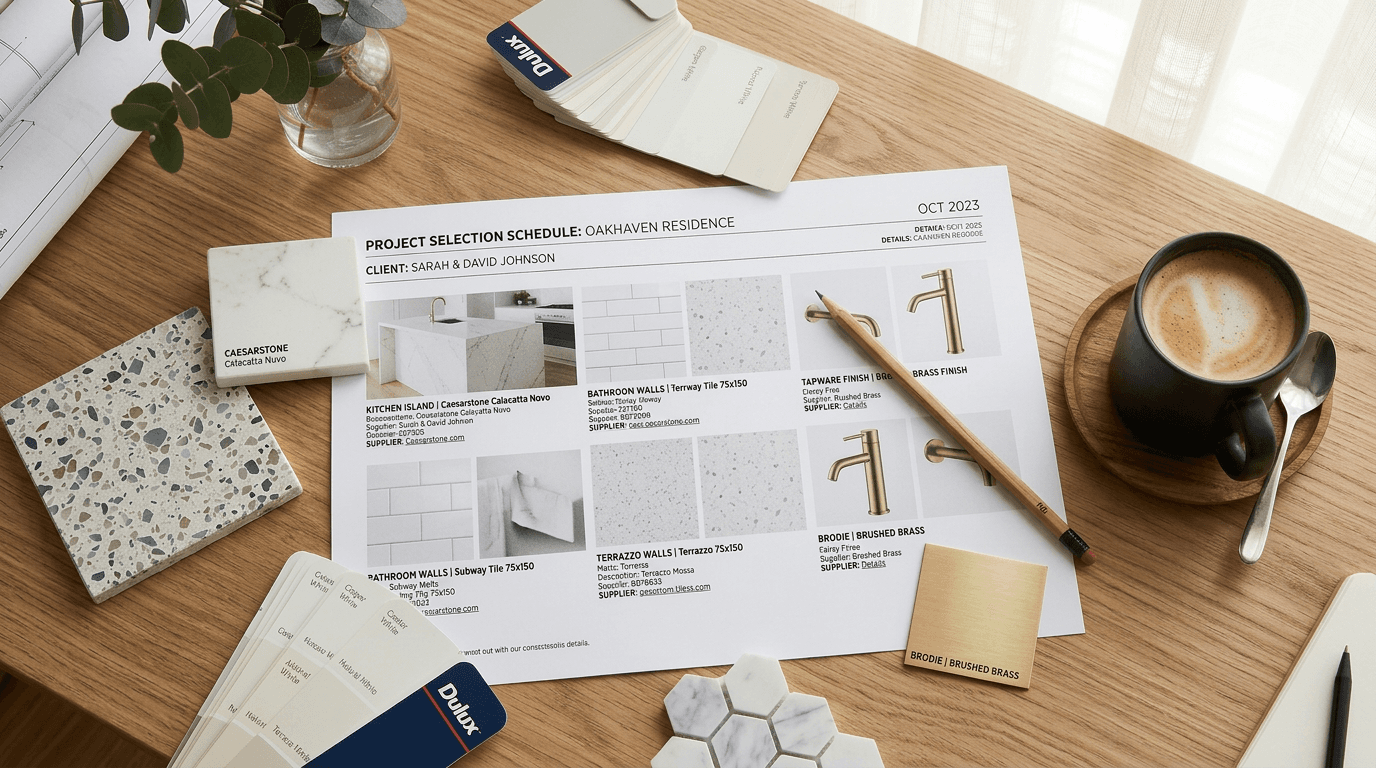
A selection schedule is a document that records every product, material and finish chosen for a building project. Think of it as the master list of decisions: what's going where, in what colour, from which supplier, and at what cost.
For a typical new home build, that means hundreds of individual selections. Flooring, paint colours, door handles, light fixtures, tapware, benchtops, splashback tiles, appliances — every single item that isn't part of the base structure needs to be documented somewhere.
A well-built selection schedule tracks each item with details like:
- The product name and supplier
- SKU or product code
- Colour, finish or material
- A product image (more on why this matters later)
- Quantity needed
- Which room or area it belongs to
- Any notes — lead times, alternatives, install instructions
Without this, you're relying on memory, email chains and scattered notes across multiple tools. Which works fine until it doesn't.
Different names, same document
Here's something that trips people up: depending on where you are and who you're talking to, this document goes by a lot of different names.
In Australia and New Zealand, builders typically call it a selections schedule or fittings schedule. Interior designers might call it a finishes schedule. If you're working with a design firm on a commercial fitout, you'll hear FF&E schedule (Furniture, Fixtures & Equipment).
In North America, builders tend to say client selections or selection sheet. Designers lean toward FF&E schedule or spec sheet (specification sheet). In Canada, you'll hear a mix of both — it depends on whether you learned from Australian or American firms.
To put that in context:
- Finishes schedule — "The architect emailed over a finishes schedule covering all wall and floor materials for the ground floor." You'll hear this most from interior designers and architects working on residential projects in Australia and New Zealand.
- FF&E schedule — "Your FF&E schedule will go to procurement once the client signs off — it lists every item from pendant lights to door handles." Common in commercial fitouts and larger design practices.
- Spec sheet — "Can you send me the spec sheet for the kitchen tapware? I need the exact SKU before I can quote." Typically used by trades and suppliers who want technical details, not client-facing presentation.
The point is: they're all describing the same thing. A structured record of what products go where. If someone sends you a "finishes schedule" or a "spec sheet," they're asking for the same deliverable.
For the rest of this guide, we'll use "selection schedule" as the default — but everything here applies whether you call it a finish schedule, a construction selection sheet, or something else entirely.
Why selection schedules matter (and what happens without one)
On a small renovation, you might get away with tracking selections in your head or a quick email thread. But on anything more than a bathroom reno, a proper selection schedule is the difference between a project that runs smoothly and one that bleeds time and money.
The cost of getting it wrong
Here's what actually happens when selections aren't properly documented:
Wrong products get ordered. The electrician installs chrome switches because that's what was on the last version of the spreadsheet. The client wanted matte black. Now you're paying for the rework and the reorder, and the client's trust takes a hit.
Trades can't do their job. Your tiler shows up ready to start the ensuite and asks for the tile layout. You don't have the product code handy, the supplier page is bookmarked on your other laptop, and the client approved the tile via a text message three weeks ago. The tiler goes home. You've just lost a day.
Clients lose confidence. When a client asks "what benchtop did we pick?" and you have to dig through emails to find the answer, it doesn't look great. Selection schedules give clients visibility into their own project — which means fewer anxious phone calls and more trust in your process.
Budgets blow out. Without a central record of what's been selected and what it costs, allowance tracking becomes guesswork. Clients don't realise they're $12,000 over their fixtures budget until the invoices land.
The flip side
Builders who use a proper selection schedule for their projects report fewer change orders, faster trades coordination, and clients who actually understand what they're getting. It's not glamorous work, but it's the kind of operational detail that separates a professional outfit from one that's constantly putting out fires.
What goes into a selection schedule?
The format varies, but most selection schedules follow a similar structure. Here's what a solid one includes:
Project information
At the top: project name, address, client name, builder/designer name, revision number and date. This sounds obvious, but you'd be surprised how many schedules float around without a revision date — which is how "FINAL_v4_updated" happens.
Room-by-room breakdown
Selections are grouped by area. Ground floor, first floor, outdoor areas — then broken down by individual room. Kitchen, ensuite, master bedroom, laundry, and so on.
Within each room, items are typically grouped by trade or category:
- Ceiling — paint, cornices, downlights
- Walls — paint, feature tiles, splashback, skirting
- Flooring — tiles, timber, carpet, thresholds
- Joinery — cabinetry, benchtops, handles, shelving
- Plumbing — tapware, basins, toilets, shower screens
- Electrical — switches, GPOs, pendants, data points
- Appliances — oven, cooktop, rangehood, dishwasher
Product details
For each item, you want at minimum: the product name, supplier, product code/SKU, and finish or colour. If you're tracking budget, add the unit cost and quantity.
Images
This is the one that most spreadsheet-based schedules skip — and it's arguably the most important column for client communication.
A selection schedule without images is just a list of product codes. Your client doesn't know what "Caroma Luna 1.0 Basin Mixer in Matte Black" looks like without a photo. And when they're signing off on 200+ selections, they need to see what they're approving.
The problem is that sourcing product images is painful. You're visiting individual supplier websites, downloading images, resizing them, pasting them into Excel cells that refuse to cooperate. For a full home's worth of selections, this can eat up an entire day.
It's one of the biggest time sinks in the whole process — and one of the main reasons builders and designers look for dedicated selection schedule software instead of sticking with spreadsheets.
The spreadsheet problem
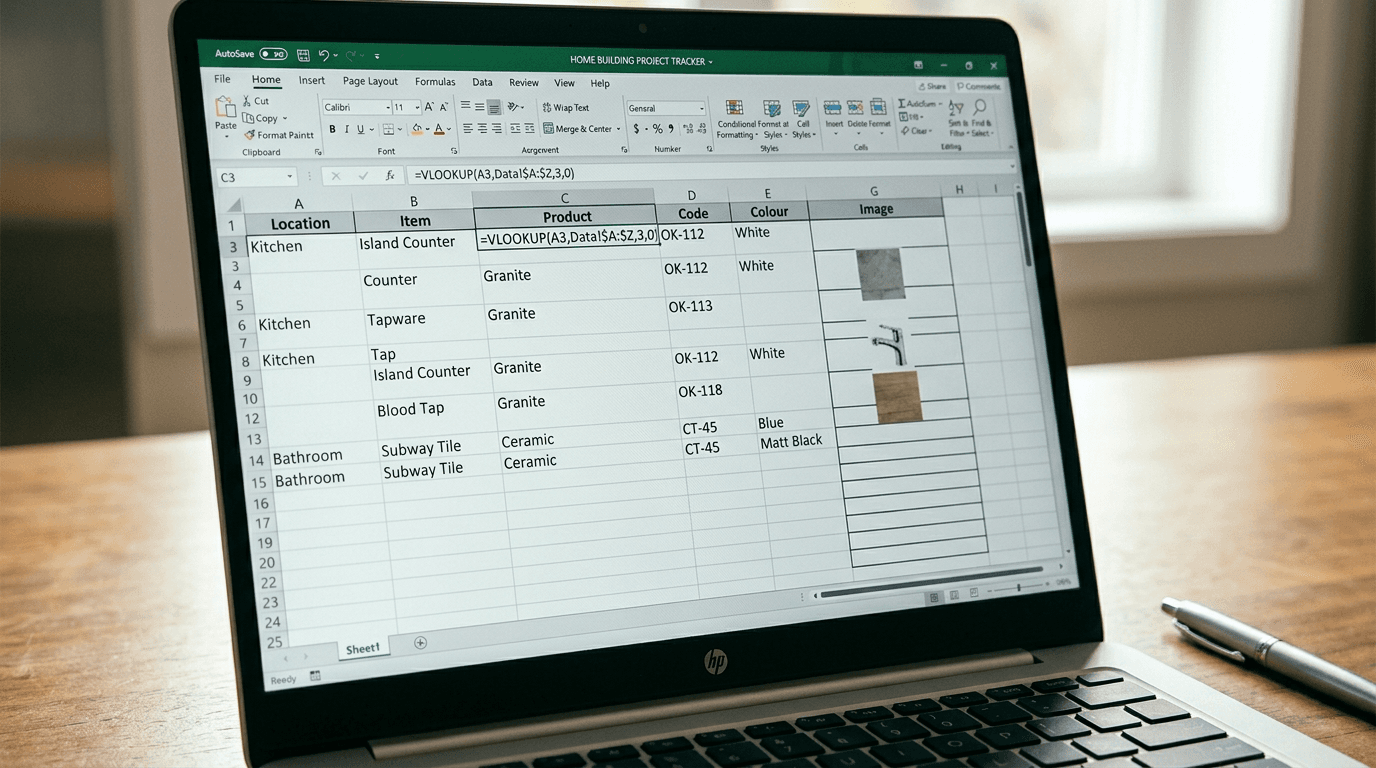
Let's be real: most builders start with Excel or Google Sheets. It makes sense. You already know how to use it, it's free, and you can set up a basic template in an afternoon.
But spreadsheets have some fundamental limitations for selection schedules:
Images don't work well. Pasting product photos into Excel cells is a nightmare. They shift when you scroll, they don't resize with the cell, and the file size balloons. Most people just give up and leave the image column blank — which defeats the purpose.
They look unprofessional. You can format a spreadsheet to look decent, but it'll never match a properly designed PDF with your logo, brand colours and clean product imagery. When you're handing a document to a client who's spending $500,000 on a home, presentation matters.
Version control is a disaster. Who has the latest version? Is it the one in the email from Tuesday or the one in the shared folder? Did the client's changes from last week get merged in? Spreadsheet version control is a constant source of errors.
No collaboration features. When your client wants to swap out a light fixture, they can't easily mark it up and send it back. You end up playing phone tag or deciphering feedback from text messages.
They don't scale. A 200-line spreadsheet is manageable. A 400-line one with merged cells, images and conditional formatting is a fragile mess that breaks if you look at it wrong.
For a single small project, a spreadsheet is fine. For anything more, most professionals eventually hit a wall and start looking for something purpose-built.
Selection schedule software: what to look for
If you've outgrown spreadsheets, there are now several software tools built specifically for managing selections. Here's what to evaluate:
Ease of use. If it takes longer to learn the software than it takes to build a spreadsheet, you won't use it. Look for something you can set up in minutes, not days.
Image management. This is the big one. Can the tool automatically find and attach product images, or are you still manually sourcing them? The best tools handle this for you.
Import capabilities. You've got supplier quotes, previous schedules, and product lists sitting in PDFs and spreadsheets. Can the software pull data from those, or do you have to re-enter everything manually?
Professional output. Can you export a branded PDF that you'd be proud to put in front of a client? With your logo, clean formatting and product images?
Collaboration. Can clients view and comment on selections without needing to download software or decipher a spreadsheet?
Pricing that makes sense. Some FF&E tools are built for large commercial firms and priced accordingly ($200-500+/month per user). If you're a residential builder or small design studio, look for tools built for your scale.
How to create a selection schedule (step by step)
Whether you're using a spreadsheet, Word document or dedicated software, the process is roughly the same:
1. Start with your floor plan
Go room by room, starting from the entry and working through the house. This ensures you don't miss anything. It's easy to forget the laundry or the garage if you're working from memory.
2. List every selection category per room
For each room, think through: ceiling, walls, flooring, joinery, plumbing fixtures, electrical, appliances, and accessories. Not every room will have every category — a bedroom won't have plumbing — but running through the full list helps catch items you'd otherwise overlook.
3. Add product details as selections are made
Don't wait until every selection is finalised to start building the schedule. Create the structure upfront with placeholder rows, then fill in product details as decisions are made with your client. This gives everyone a clear picture of what's been decided and what's still outstanding.
4. Include images for every product
Yes, every product. This is the single biggest thing you can do to reduce client confusion, prevent sign-off disputes, and make your schedule actually useful for trades. It's time-consuming if you're doing it manually — but it's worth it.
5. Track revisions
Every time a selection changes, update the revision number and date. Keep a brief log of what changed and why. Your future self will thank you when the client asks "when did we change the splashback?" six months from now.
6. Get formal sign-off
Once selections are complete, get your client to formally approve the schedule. This protects both parties. A signed selection schedule is your reference document for ordering, and it's your evidence if a dispute arises about what was agreed.
Free selection schedule template
If you're just getting started, we've put together a free finishes schedule template that covers a full residential build — entry, living areas, kitchen, bedrooms, bathrooms, laundry, garage and outdoor spaces.
It's structured with the column layout most Australian and NZ builders use, but it works just as well for North American projects. The image column is front and centre, so you can see exactly where the pain of manual image sourcing hits.
Download the free template
Enter your details and we'll send you the selection schedule template — plus occasional tips on managing selections faster.
Fair warning: after filling it in for one project, you'll probably understand why most builders switch to dedicated software pretty quickly.
When to start your selections
One of the most common questions builders and designers get from clients is: "When do we need to decide all this?" The answer depends on the stage of the build, but the general rule is earlier than you think.
Here are the key milestones where selections need to be locked in:
- Pre-contract / tender phase — Structural choices that affect construction cost: window sizes, facade materials, roof type, floor plan changes. If these aren't settled before contracts are signed, variations get expensive fast.
- Pre-construction — Wet area selections (floor tiles, wall tiles, tapware) need to be finalised before trades are scheduled. Your tiler can't order materials if you haven't picked a tile.
- Frame stage — Electrical and lighting selections need to be confirmed before rough-in. The electrician needs to know where every GPO, pendant and downlight goes before walls are closed.
- Lock-up stage — Final joinery specs, appliance models and anything with long lead times. Kitchen cabinetry in particular can take 8–12 weeks from order to installation.
Starting the selection schedule at the beginning of the project — even as an empty framework — means you always know what's been decided and what's still outstanding. It also gives clients a visual deadline: when the frame goes up, the electrical choices need to be done.
Frequently asked questions
When should I start my selection schedule?
As early as possible — ideally before contracts are signed. Structural choices like window sizes and facade finishes often need to be locked in during the tender phase. For everything else, build the schedule framework in pre-construction and fill in product details as decisions are made. Getting selections finalised by frame stage gives trades enough lead time to order materials without rush fees.
What's the difference between a selection schedule and a spec sheet?
They cover similar ground but come from different disciplines. A spec sheet (or specification sheet) is typically trade-facing and focused on technical product details: dimensions, load ratings, installation requirements. A selection schedule is client-facing — it records what was chosen, not how to install it. In practice, most builders and designers use the terms interchangeably.
How many selections does a typical new home have?
A full new home build typically involves 150–300 individual selections, depending on the size and specification level. A 4-bedroom home with two bathrooms, a laundry, and open-plan living will generate 200+ line items across flooring, tiles, tapware, joinery, electrical, and appliances. Entry-level builds with limited customisation sit toward the lower end; high-spec custom homes can exceed 400 selections.
Do I need a selection schedule for a renovation?
Yes, even for a single-room renovation. A bathroom reno alone can involve 30–50 selections — tiles, grout colour, vanity, tapware, shower screen, lighting, towel rails. Without a selection schedule, you're relying on email threads and memory to coordinate between your client, your tiler, your plumber and your cabinetmaker. That's where mistakes happen.
Wrapping up
A selection schedule isn't complicated. It's a list of products, organised by room, with enough detail for everyone — clients, trades, suppliers — to know exactly what's happening.
The hard part isn't understanding what a selection schedule is. It's maintaining one across a full build without losing your mind to spreadsheet formatting, image sourcing, and version control chaos.
If you're still early in your process, grab the free template above and see how it goes. And if you hit the wall — the one where you're spending more time fighting Excel than actually building — that's probably a good time to look at purpose-built tools. If you've been looking at platforms like Fohlio, it's worth reading our Fohlio alternative breakdown to understand where the tradeoffs sit before you commit.